
General Technical FAQs
Here you can find the answer to some of the main technical questions that may arise.
If you need additional support, feel free to contact us at support@critical-links.com
What kind of answers will I find in the Technical FAQ?
In this page you will find technical answers to some common C3 Micro-Cloud configurations.
When I access the C3 Micro-Cloud I see a security error. How do I fix it?
With regards to your C3 Micro-Cloud, this warning may also occur if the valid security certificate on your C3 Micro-Cloud has simply expired and your C3 Micro-Cloud has not been able to connect to the host server in order to have the certificate updated. Your C3 Micro-Cloud is originally shipped with a valid security certificate that, currently, can last up to 1 year. Security certificates expire annually, and for those systems that have sporadic connectivity or are that are deployed in ‘offline’ modes, this can be a normal behavior.
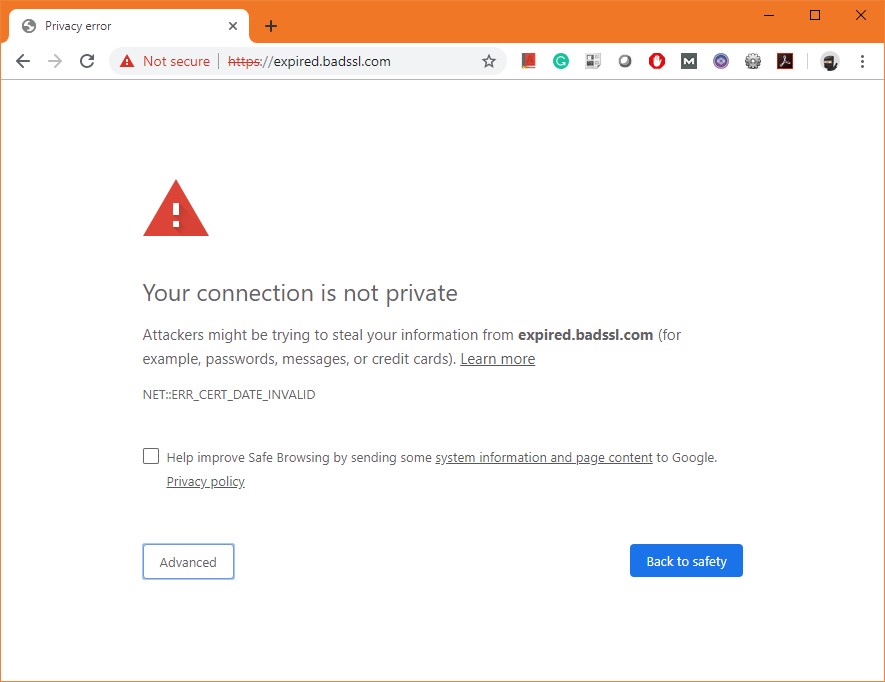
Figure 1: Expired Security Certificate example
When encountering this error, there are a number of options that you have, including 1) proceed with the current configuration using the Advanced button, 2) updating your C3 Micro-Cloud to the latest version by accessing your C3 Cloud Control instance, 3) updating your C3 Micro-Cloud to the latest version using a command line interface (CLI) process, or 4) updating your C3 Micro-Cloud using a USB pen with an update security certificate.
Option 1: Proceed Anyways
In the case of offline systems, it’s important to remember that you are accessing sites that have been
downloaded and are cached (stored) locally on your C3. You are offline, so you are not actually accessing a compromised site ‘live’. By choosing this option, you are acknowledging that you are offline, and you choose to proceed anyway. You will only need to do this once unless the C3 Micro-Cloud is reset. To employ this option, simply select the Advanced button, and choose to ‘proceed anyway’. Users of the C3 Micro-Cloud will then be able to use the system as normal.
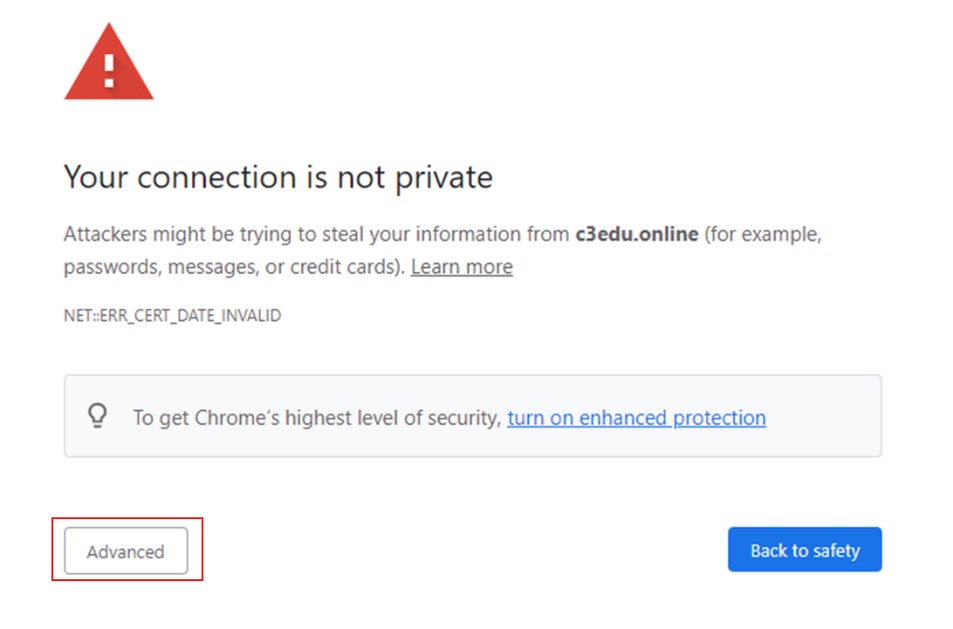
Figure 2: Step 1 - Press the Advanced Button
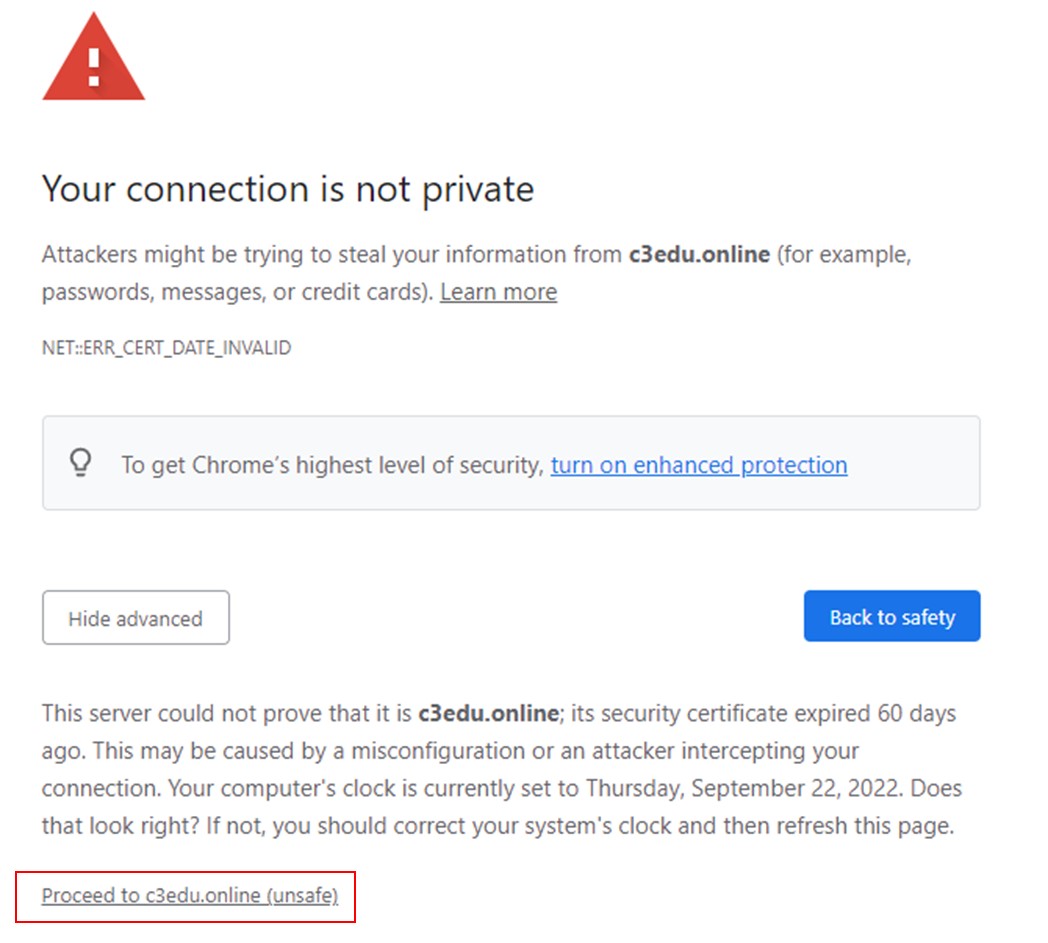
Figure 3: Step 2 - Select Proceed to c3edu.online
Option 2: Update to the latest version (Internet Required, Active Support Contract Required)
If you are under an active support contract and you have Internet Access, then you can simply update your C3 Micro-Cloud to the latest version (at the time of writing, this is version 4.7.1). Updating to this version will do 2 things:
- Update the security certificate to the latest one that has a valid date.
- Enable a feature that will automatically update the security certificate before the current ones expires, provided that the C3 Micro-Cloud is connected to the Internet.
This is the easiest and most complete solution for this issue. This requires an active support contract or otherwise you might be unable to use this method to update your C3 Micro-Cloud. To proceed with the update, you need to access your C3 Micro-Cloud with administrator credentials (by default it’s username: c3; password: root), then “Configure”, “Update”, and once in the Update page, after a few seconds, you should receive a message stating there is a new version to update. For more details on the Update process please review the C3 Micro-Cloud Configuration Manual here: C3 Micro-Cloud Manual
Option 3: Command Line Script (Internet Required, Advanced)
In the case that you don’t have an active Support Contract or you don’t want to update the C3 Micro-Cloud to the latest version, you can still update the security certificate and also enable the feature that allows you to automatically update the security certificate before the current one expires.
You need to start by opening a SSH session to the C3 Micro-Cloud. You can learn how to do this in the “Using Putty to open a SSH connection to the C3 Micro-Cloud” in this document. After you have opened a SSH connection to the C3 Micro-Cloud, you need to perform the following command (past this exact command in the putty window after you login):
curl -ks https://public.critical-links.com/certificates/update-certificates.sh | sudo sh |
Warning: execute this script only once!
This command will prompt you for a password. This is the same password that you used when you logged in with Putty.
After you execute this command successfully, you will have an updated security certificate along with an automated security certificate update.
Option 4: USB Pen and Command Line Script (No Internet Required, Advanced)
If you have no internet connectivity, there is still a way to update the security certificate. However, you will still need either a USB pen with the appropriate files from your administrator, or access to the Internet in some other computer to prepare your own USB Pen with the necessary scripts and files. This option will allow you to install an updated security certificate and will also enable a feature that will allow you to update the security certificate in the future using only an USB Pen.
- Start by downloading all the necessary files from here: USB Security Certificates
- Format a USB Pen with FAT32 and assign it this exact name (everything in uppercase): USBPEN
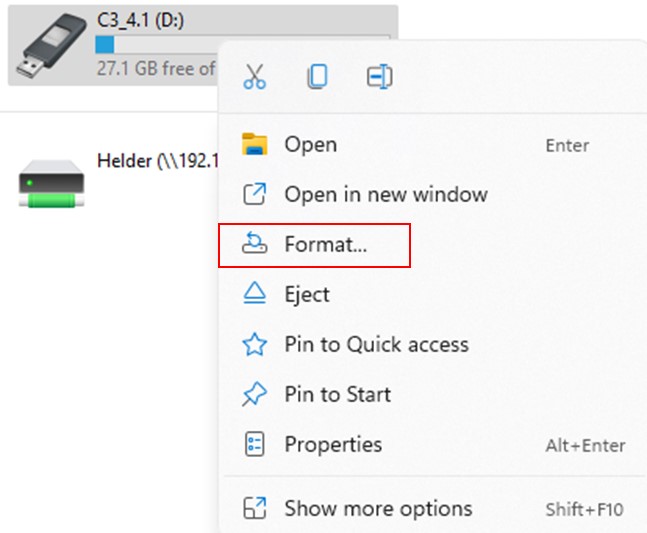
Figure 4: Contextual Menu with Format Option
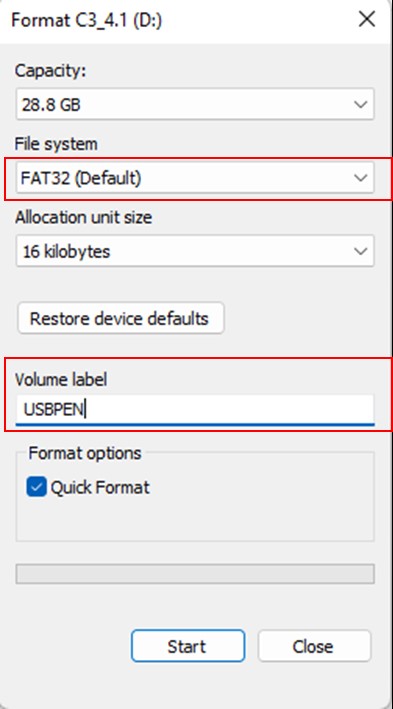
Figure 5: Format Dialog with highlighted options
- Extract the contents of the file that you just downloaded to the root of the USB Pen.
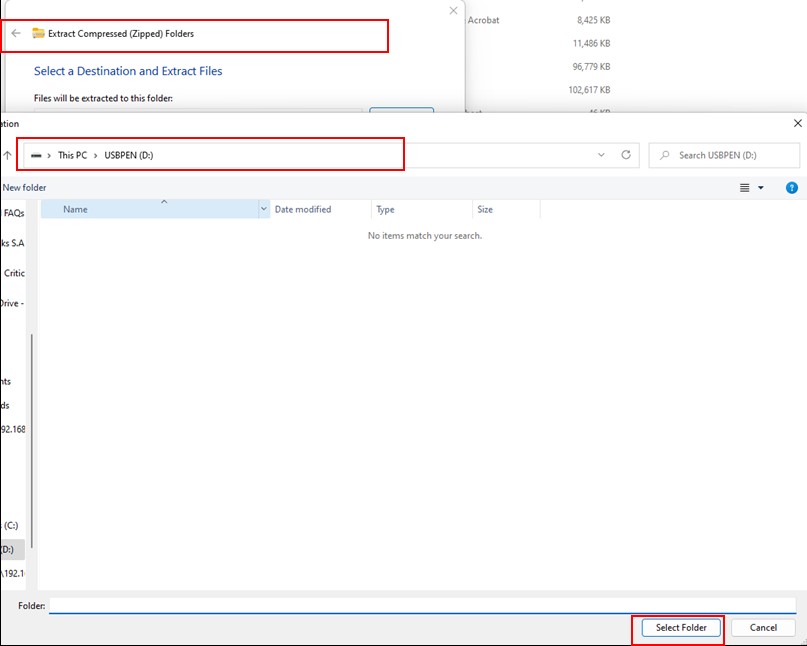
Figure 6: Details on how to extract the zip usbcertificates.zip
- After extracting all the files, you should be able to see something like this:
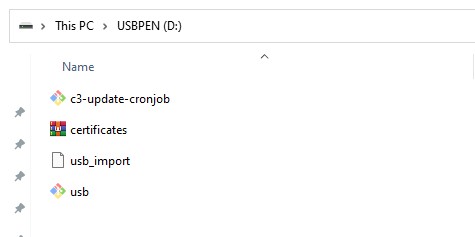
Figure 7: USB Pen content after zip extraction
- Now, take the USB Pen to your C3 Micro-Cloud and connect it to one of the available USB ports. After that, open an SSH connection to the C3 Micro-Cloud (If you need help on how to open a SSH connection to the C3 Micro-Cloud, check the section “Using Putty to open a SSH connection to the C3 Micro-Cloud in this document) and perform the following command (past this exact command in the putty window after you login):
sudo bash /media/USBPEN/usb.sh |
This command will prompt you for a password. This is the same password that you used to access the C3 Micro-Cloud using SSH. After performing the command, you will have an updated security certificate and a method for updating the same security certificate in the future.
Option 5: Using Putty to open a SSH connection to the C3 Micro-Cloud
In some of the options presented in this document, you will need to access the C3 Micro-Cloud using an SSH client. If you are using Windows, you can use putty, that you can download here: Putty Download Page.
After downloading and installing Putty, open it and specify the Host Name (or IP Address) as c3edu.online (remember that you need to be connected to the C3 Micro-Cloud):
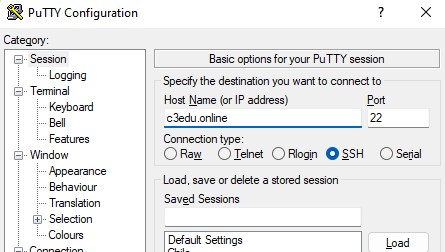
Figure 8: Putty access page
After that, click on the Open button or press Enter. When doing it, this will open a new dialog like the one shown here:
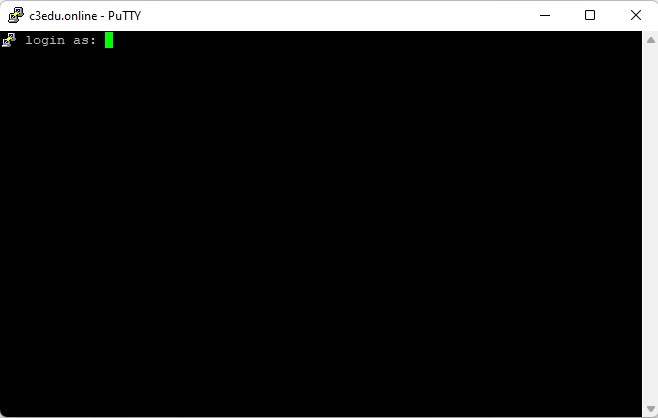
Figure 9: Putty login prompt
Use the following information to login to you C3 Micro-Cloud:
- Login as: c3
- Password: root
“root” is the password that is shipped by default with your C3 Micro-Cloud. If you have changed the default password to the c3 user, then you need to use the new one instead of the default one.
After you have successfully inserted your username and password, you will have a putty window that is, essentially, a command line. You can now insert any valid Linux command in this window. When this document instructs you to perform a command, this window is the place where you should perform it.
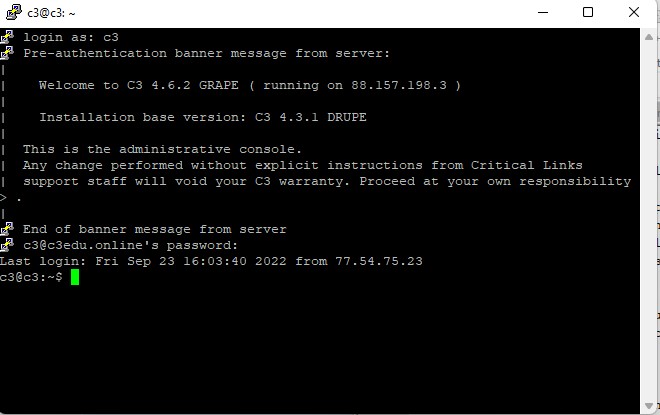
Figure 10: Putty window after a successful authentication
How can I update my C3 Micro-Cloud device without an active internet connection?
This article will explain how to use a windows script to automate the C3 Micro-Cloud update process.
C3 Micro-Cloud update using a Windows device
This article will provide you with clear instructions on how to update your C3 Micro-Cloud device to version 4.8.3. Among many improvements, this version includes the capability of accessing your C3 Micro-Cloud device using a regular http connection instead of a https connection. This will ensure that students and teachers that connect to the C3 Micro-Cloud device will never see a security certificate error if the C3 Micro-Cloud has not been connected to the internet and updated for a long time.
If you have a Windows laptop connected to the C3 Micro-Cloud, this method will allow you to easily update your C3 Micro-Cloud device. Connecting your Windows laptop to your C3 Micro-Cloud device can be done by WiFi or by LAN cable, depending on the model that you have.
When connecting by WiFi, the default password to access the C3 Micro-Cloud WiFi network is “mydemokey”. If your C3 Micro-Cloud has a different WiFi password, then you need to use it.
Start by gathering information about your C3 Micro-Cloud, namely the password for the user c3 (the main administrator). This password is required by the script to apply the update to the C3 Micro-Cloud.
If this password has been changed you need to register it since you will need to change the provided script with the new password.
- Start by downloading the offline update solution to your computer. You can get access to this offline update solution by sending an email to support@critical-links.com and stating the License ID of your C3 Micro-Cloud device.
- Extract the downloaded file to your computer and you should see 4 files:
1) c3updater.bat
2) update_packages.tgz
3) plink.exe
4) pscp.exe
- (Optional: only perform this step if the password for your c3 user is not the default one, which is root) If your C3 Micro-Cloud has a different password for the c3 user, then you need to edit the c3updater.bat file with a text editor and change the following parameter to the correct password:
SET C3_PASSWORD=<CorrectPassword>
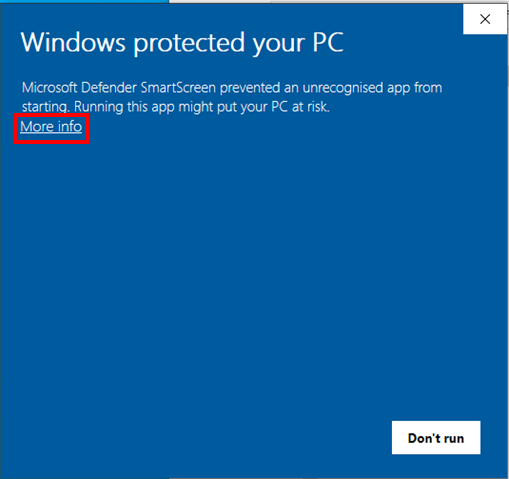
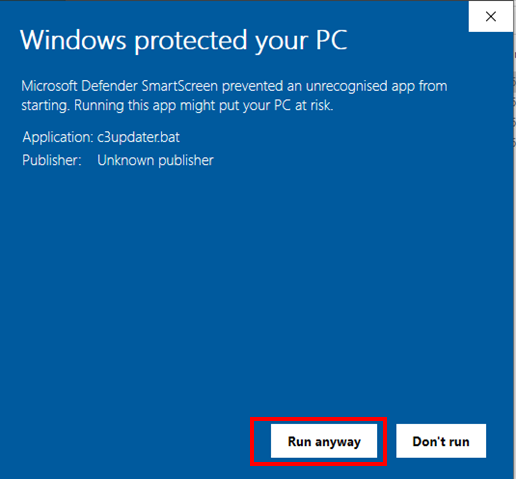
- Now, double-click the file c3updater.bat
On some Windows computers, you will see a warning about executing scripts. Click on "More info", and then on "Run anyway"
- After the script finishes its execution, go to http://c3edu.online and you will have access to your updated C3 Micro-Cloud.
How to import content to the C3 Micro-Cloud using a USB flashdrive?
It is possible to add content directly to a C3 Micro-cloud by simply inserting a USB flash drive with the required content in it.
This can be done using the C3 Packager application. The C3 Packager provides an easy interface for quick C3 content package creation, so you can load new content locally in no time. The program sequentially asks for the content name, description, image thumbnail, and finally the folder where the content resides in your local workstation.
Content to be packaged can be any C3 type of content such as any type of file, video, audio, static websites, etc. Wikipedia content is not supported in this feature and needs to be created in the C3 via C3 Cloud Control.
The C3 Packager creates a file with the extension c3pkg in the same folder where the program is installed. Next, it needs to be copied to the USB flash drive which will then be inserted into one of the C3 USB slots, automatically starting the import process. No further user interaction will be necessary
The C3 Micro-cloud automatically detects the *.c3pkg files and creates the corresponding content packages in its content page. On this page, it is possible to visualize the import process.
The name of the content package will be the name assigned during the package creation (not the name given to the c3pkg file). If the USB flash drive contains multiple *.c3pkg files they will be imported one by one. These packages will be assigned to the user c3.
If on the C3 Micro-Cloud content with the same name, already exists, the new package will not be imported into the C3.
After importing, each package will have the same properties as a locally created package. Its name, description, and thumbnail can be edited, and subject, grade, tags, and visibility properties can be added as required. To remove the content package simply delete it as a standard local package.
The C3 system admin is able to monitor the import process, opening an SSH session to the C3 command line and using the following command:
The C3 Packager is available for Windows and Linux (Debian/Ubuntu)
You can find the C3Packager application in our support portal by following this link: https://support.critical-links.com/a/solutions/articles/176747?portalId=62435
How to use the C3 CloudVPN Feature?
The C3 CloudVPN feature allows you to remotely access a C3 micro-cloud device and work with it as if you were directly accessing the C3 from the Lan or Wif-FI side.
This feature is designed for maintenance and support and not for everyday usage by schools. This feature is enabled in the Remote Services part of the C3 configuration, accessible only by the C3 administrator. For this to be possible you need to first request access from Critical Links, stating the License ID of the target C3.
After CloudVPN is enabled on the C3 side, it will be necessary to install on your windows laptop a special VPN Client. Instruction on how to download, install and configure this VPN Client, is available here: CloudVPN Client Administrator Guide
How to install the C3 Proxy Certificate?
The Proxy Certificate is required to be installed in your workstation, if the features "HTTPS Caching" and "Intelligent Video Caching" features are enabled.
The articles and manual pages describing these features also detail how to install the proxy certificate.
The following instructions apply to the installation of the certificate in a windows workstation when using a browser such as Chrome, Microsoft Edge, or Opera.
NOTE: Please check if no Critical Links Certificate already exists in your workstation. If it exists, delete it before proceeding.
Click on the Download proxy certificate green bar as above. A small file, named proxy.crt will be downloaded to your workstation.
In your windows workstation open the cmd program and then type certlm to open the Windows certificate management application.
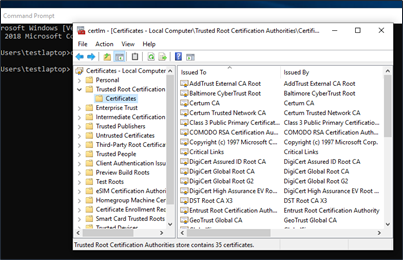
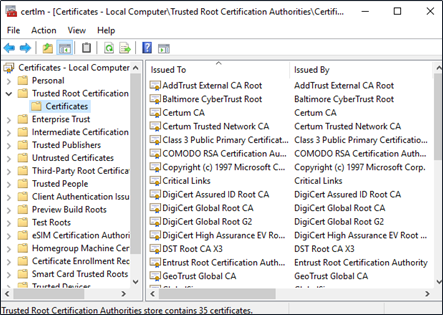
In this application click on the Trusted Root Certification Authorities folder and then Certificates:
A new screen will open, showing the current certificates of this type installed in your workstation:
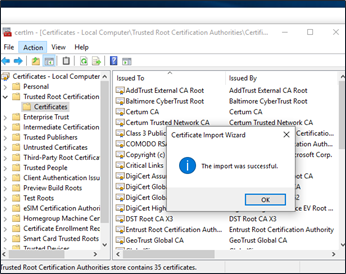
Next click Action -> All Tasks -> Import to import the newly downloaded certificate. Click Next and browse in your computer for the proxy.crt file.
When selected click next and confirm that the import will be to the Trusted Root Certification Authorities folder. Click Next and follow the wizard until you get a success pop-up message:
You can check the existence of the Critical Links Certificate in the Certificates folder under Trusted Root Certification Authorities.
The C3 HTTPS cache configuration process is now finalized. Close the certlm and the cmd programs, restart your browser, the C3 is now caching https sites and content.
If you are using the Firefox browser, please see Installing a certificate in a Firefox Browser how to install the certificate directly in this browser.
Installing a certificate in a Firefox Browser
The Firefox browser manages its own security certificates, independently of the operating system. To install the Critical Links certificate, follow these steps, after downloading the certificate to your workstation.
After opening Firefox, select Options from the Menu option on the upper right side.
Select Privacy & Security, scroll down to Certificates and click View Certificates, opening the Certificate Manager:
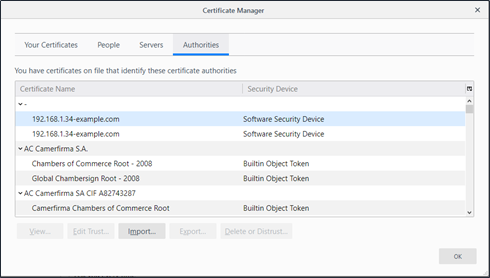
Next click the Import Button, browser for, and select the proxy.crt file:
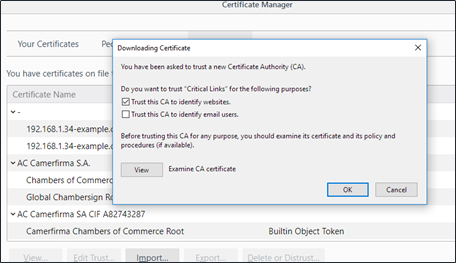
Select “Trust this CA to Identify websites” and click OK. Now browse the certificate list and confirm that the Critical Links certificate is present. Now closing and reopening Firefox will allow this browser can also be used with the C3 when it is in HTTPS caching mode.